Astell&Kern DAPs: How to Install, Download, and Stream Music

Ultimate Guide to Streaming Music on Your Digital Audio Player
So you've finally set up your new Astell&Kern digital audio player (DAP) and you're ready to jump into music streaming–but how? Maybe you've got a large collection of music stored on your computer that you're dying to transfer over or you struggling to use your portable music player in the car. Consider this guide your saving grace, chock-full of everything you need to know to stream, download, and enjoy your favorite music.
Astell&Kern creates the best high-end music players in the world as our customer reviews note plus their technology is easy to learn and navigate as a newbie or a tech wizard. Our founder, Drew Baird, P.E., and the staff at Moon Audio recommend Astell&Kern high-resolution music and media players for people who love “portable audio.” Astell & Kern (A&K) music players are "iPods on steroids". If you love to listen to music on the go and want hi-res audio AK Digital Audio Players (DAPs) are essential listening gear with Mastering Quality Sound (MQS).
Astell&Kern Guide to DAPs, IEMs & More
Discover the leader in portable Hi-Fi Audio with Astell&Kern DAPs, DACs, Portable DACs, In-Ear Monitors–Not just your average MP3 players
Installing Apps on your DAP: Astell&Kern Open App & APK Support
While Astell&Kern DAPs have an Android-based operating system they don't come preloaded with every app you could possibly need. With newer AK DAPs, there will be a few apps pre-installed like Qobuz and Tidal–and several additional you can install–but anything else you'd like to add has to be done via Astell&Kern's Open App Service.
Of course, if you're not familiar with the Open App Service or installing APK applications on Android, it can be a bit confusing how to do it or where to start.
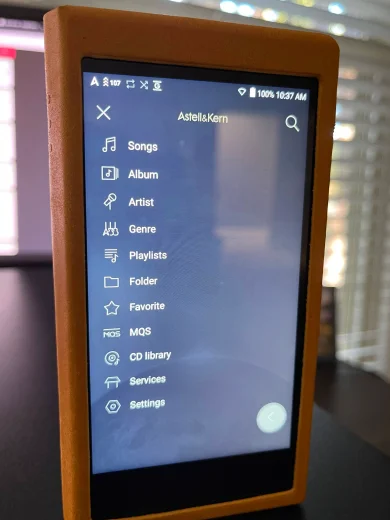
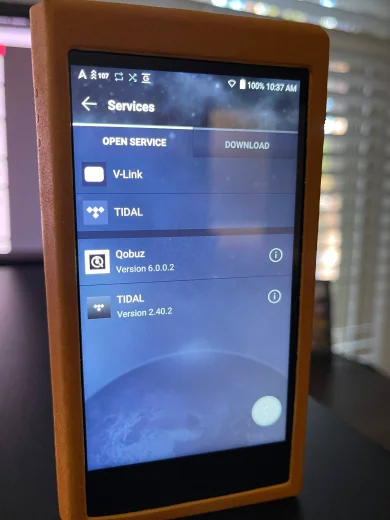
When going into your new Astell&Kern DAP music player, like the SP3000T, you'll find the pre-installed APK apps in the following location:
- Select the "A" to get into the main menu of the music player
- Select "Services"
- You'll see the pre-installed apps below the divider (with the app version listed)
- Click once to install the app
- Once installed, click again to open the app
- Login using your credentials
How to Download & Install APK Applications
Most users install their apps from the store that comes installed on the device itself, however, sometimes specific apps are not officially supported by the device or might not be available in your country. The only way around this is to find a package of the application online and install it manually onto the device. This is known as sideloading.
Android File Package (APK)
The standard format for Android OS and applications is the Android Package File, or APK. Typically, users never see these files because Android handles much of the app installation behind the scenes via Google Play Store or another app distribution platform. Google Play requires that the compressed APK file that users download be no more than 100MB.
An OBB file is an expansion file used by some Android apps which contain data not stored on the application's main package, usually consisting of larger program assets. Each time you upload an APK file using the Google Play console, you can also add one-to-two .OBB expansion files to the package. These accompanying .OBB files can be any format (mp3, mp4, pdf, zip, etc) and can be up to 2GB. The OBB file consists of extra data that helps keep the app running, and is also used as a workaround for the 100MB size limit on the APK file, allowing for the additional data to be included.
What is XAPK?
XAPK is an Android Application Package file format. An XAPK file usually consists of at least one APK file and an OBB file. An XAPK file is compressed with these files attached creating a single file for download and installation. A single compressed file has many advantages including smaller file size for faster downloads, compared to the raw file size.
The only thing about XAPK files is that they cannot be installed the same way APK files are if going through the procedures manually. You will need to install a separate XAPK installer to correctly unpack the data onto your device. We'll walk you through the necessary steps below.
How to Install XAPK Files:
1. Confirm you have the APK Pure XAPK Installer installed as an app on your Open App supported AK player under the services menu
2. If you have not installed the XAPK installer, download the XAPK Installer from the following link: APKPure.com > XAPK Installer
3. Copy to Open App Service folder. Once it appears in the services menu on the player, install the XAPK Installer on the player like you would any other APK file
4. Copy the XAPK of the music service you would like to install to the OpenService folder.
5. Open XAPK Installer app in the services menu on the player. Choose the XAPK file you would like to install and then click "Install."
Transferring Files to an Astell&Kern DAP
The Open App Service is your gateway to music streaming services and apps, but those interested in transferring iTunes libraries, local music files, and connect to computers–this section is for you! Astell&Kern's main way to transfer music files is AK File Drop.
AK File Drop: The Quickest Way to Transfer Files Wirelessly
AK File Drop or File Transfer allows you to wirelessly drop music files from your PC to your AK DAP, making them accessible locally on your player, rather than streaming them like you would using BT Sink. With AK File Drop, you're essentially setting up your DAP as a network drive, allowing you to view and modify file contents remotely. Here, you can read about how to use and setup AK File Drop.
How to Set Up AK File Drop (Windows)
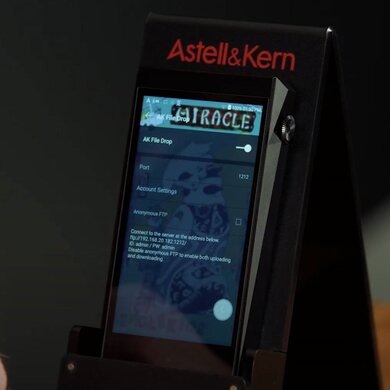
Step 1: Turn On AK File Drop
Head to the main settings for your Astell&Kern player.
Click on the option for "AK File Drop" and turn it on.
Once enabled you'll see connection directions pop up on the screen.
Keep this accessible as you'll need them to configure the network address on your computer. *Before continuing, make sure that both your computer and DAP are on the same wireless network.
Step 2: Create New Network Location
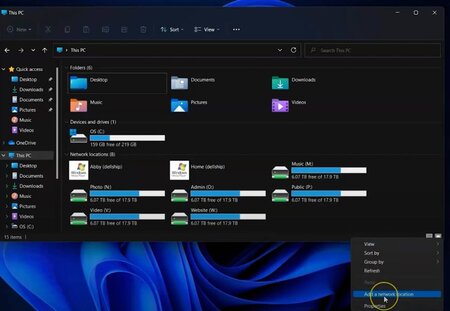
Once you have AK File Drop enabled on your Astell&Kern DAP, head to the "This PC" window which shows all your drives.
Mac users will need to configure their network locations accordingly.
Right-click on the background of the window and select "Add Network Location."
Step 3: Begin Setup Wizard
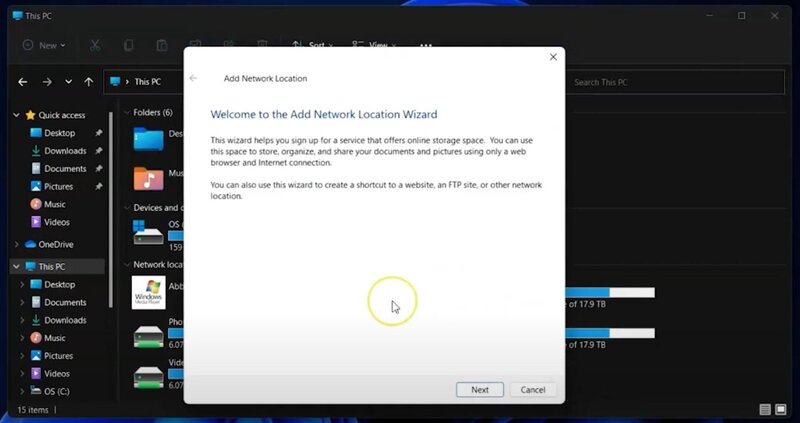
The setup wizard will automatically pop up. This will guide you through the set up process to configure your DAP as an accessible network drive that you can drag and drop music into. Click "Next."
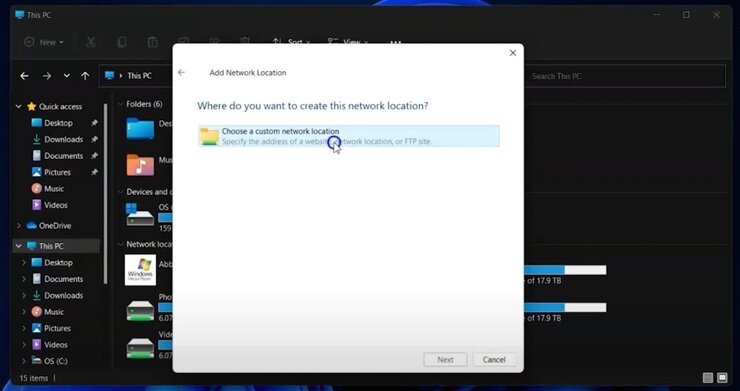
Step 4: Choose Network Location
Choose a custom network location. Remember the information that popped up on your DAP after you enabled AK File Drop? Get it ready. You'll need it next.
Select "Choose a Custom Network Location" and continue.
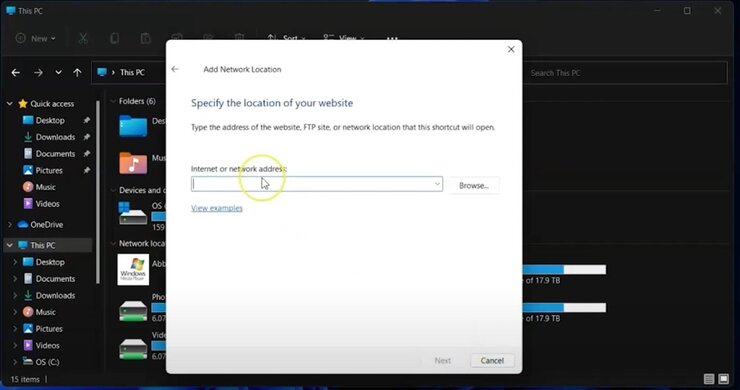
Step 5: Configure Network Address
Input the address given on your DAP screen and type it here. Be sure to include the "ftp://" at the beginning and do not include the forward slash at the end.
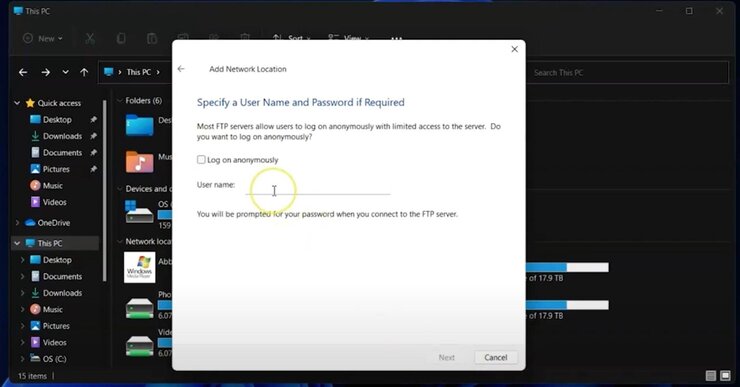
Step 6: Specify User Name
Designate a User Name for the device. Be sure to de-select (uncheck) "Log on anonymously" before continuing.
Step 7: Name Location
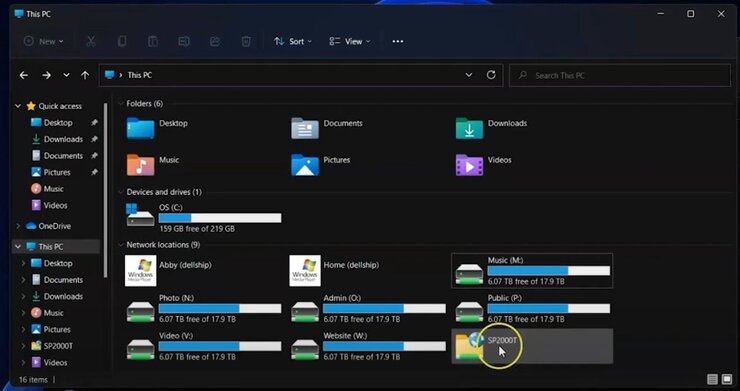
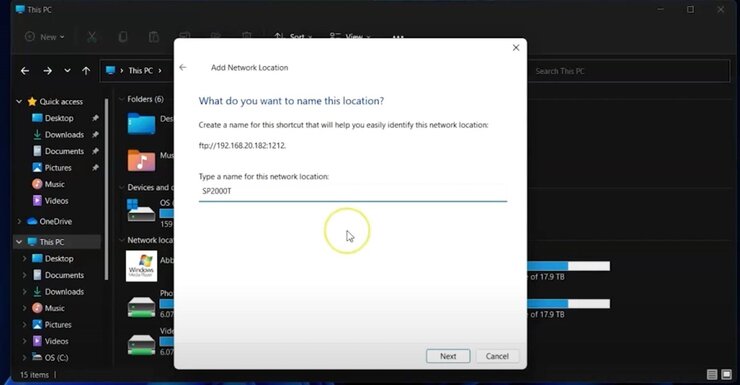
Here you have the opportunity to name the location of your Network Device as it will show up in the drive menu. We selected the name of the DAP as "SP2000T" to more easily designate the music player when transferring music.
Step 8: Finalize Settings
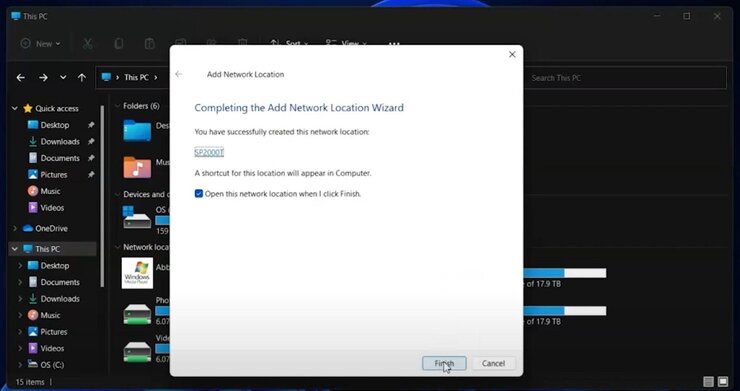
Next a screen should pop up saying, "Completing the Add Network Location Wizard." You can choose to open the network location as soon as you finish the setup wizard. Click "Finish."
Step 9: Log In
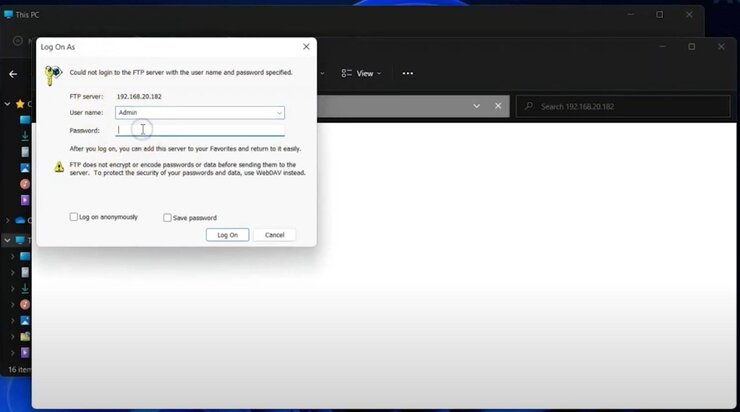
Here you will log in to the FTP server as instructed by the info screen on your DAP. The user ID will be "admin" and the user password will be "admin." Make sure they are lowercase as shown on the DAP. Click "Log On."
Step 10: Network Drive Now Visible
Your DAP should now be visible in the drive menu. Double-click the folder to access your files and music.
Transferring Music Files
From Computer:
1. Make sure your computer is connected to the same Wi-Fi network as your AK DAP
2. Open a web browser on your computer and enter the IP address displayed on the AK File Drop screen of your DAP. This IP address will typically be something like "http://192.168.1.1:9999" (the exact address may vary).
3. You should see the AK File Drop web interface on your browser. Here, you can drag and drop music files from your computer directly into the web interface to transfer them to your DAP.
4. The files will be transferred wirelessly to your DAP and saved in the designated music folder.
From Mobile Device:
1. Ensure your mobile device is connected to the same Wi-Fi network as your Astell&Kern DAP.
2. Open a web browser on your mobile device and enter the same IP address displayed on the AK File Drop screen of your DAP.
3. Similar to the computer process, you'll see the AK File Drop web interface on your mobile browser. Here, you can select music files from your device and upload them to your DAP by tapping the upload button or dragging and dropping.
4. The music files will be transferred wirelessly to your Astell&Kern DAP and saved in the designated music folder.
How to Set Up AK File Drop (Mac)
The process is not much different on a mac. We'll walk you through it step by step (make sure you are using Admin privileges as accounts that don't have permissions will be unable to create a connection to the DAP/network drive):
1. Launch the Finder
2. Click the Go tab, and select Connect to Server
3. Enter the path given for the AK DAP to connect as a network drive. If you're prompted for a confirmation, click Connect
4. Once the DAP is mapped, you'll find it on your desktop as a mounted drive or under the Locations menu in any finder window
The next steps are important so you can permanently mount the drive to your Mac and prevent yourself from doing this process each time you restart your computer. You'll need to enable automounting via Login items under your user account preferences. To do this:
1. Click the Apple Logo and select System Preferences
2. Click Users and Groups
3. Select the user name that has access to the drive. Select the Login Items tab
4. Navigate to the drive/DAP you wish to add. Click once to select it, and then click Add
How to Transfer Your iTunes Library to AK DAP

Astell&Kern is one of the most popular music player brands in the audiophile market, but there's a downside: Astell&Kern music players aren't officially supported by iTunes. The result is that the user has to use a 3rd party application to get the music from the iTunes interface/storage to the device via computer. It's not the most intuitive or easiest process in the world, but alas, it can be done!
To move files from an Apple Mac to AK DAPs you must use MacDroid. This software works in conjunction with Mac Finder, so when you connect your AK DAP to a Mac computer, MacDroid will open showing you directory locations on your DAP for internal storage or your attached SD cards in the unit.
Transferring iTunes from Mac
Step 1: Open Safari on your Preferred Browser
- Enter the following URL into your browser: macdroid.app
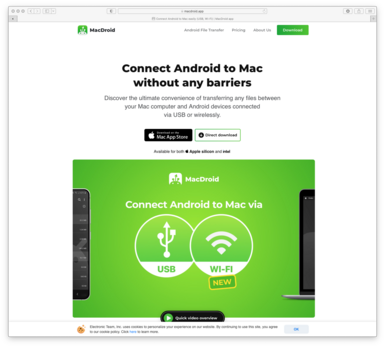
Step 2: Download MacDroid on your Computer
Once on macdroid.app, click on the green box at the top right corner of the page that says "Download" to download the application to your mac computer.
The dmg.file will automatically download.
Once downloaded, open your file folder (or download window) and click on the macdroid.dmg file to start the installation.

Step 3: Run the MacDroid.dmg file and drag it to the Application Folder
After the dmg.file is installed, a MacDroid pop-up window will appear.
Click and drag the application on the left to the Applications folder on the right.
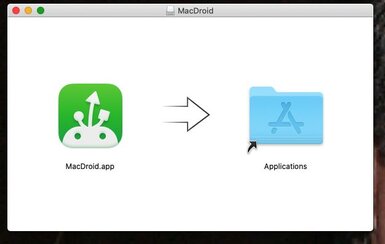
your system will request authentication. Click "authenticate."
Once authenticated, your system will request you to enter your computer's administrator user ID and password. Enter both required fields and click "OK."
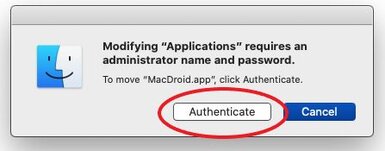
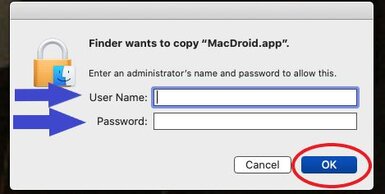
Once the administration information is entered, the MacDroid application will appear in your applications folder.
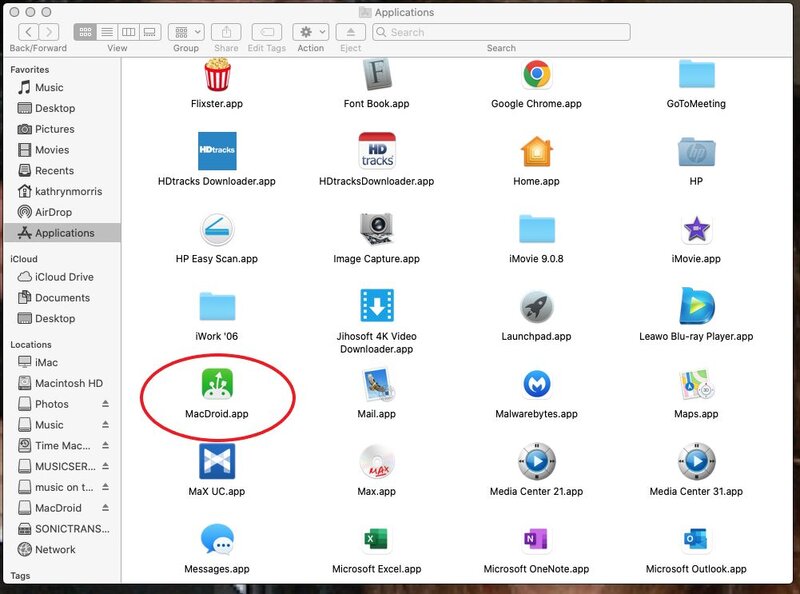
Step 4: Connect your DAP to the Computer
- Connect your DAP to the computer via a compatible USB Cable
- Turn on the DAP
- Make sure in the SETTINGS of your DAP under USB Mode, you have it set as MTP
Step 5: Launch the MacDroid Application
- In the Applications Folder on your Mac computer, click on the MacDroid Application
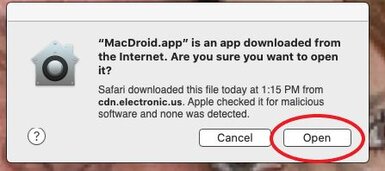
- The computer will ask if you want to open the application since it was downloaded from the internet. Click Open
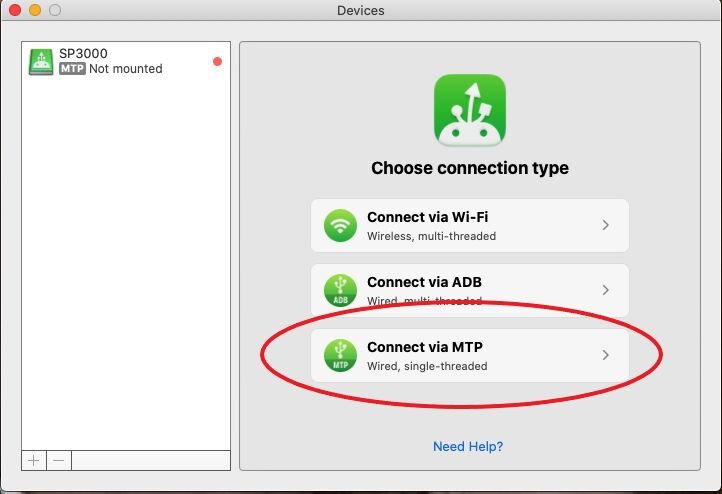
4. Click "Mount"
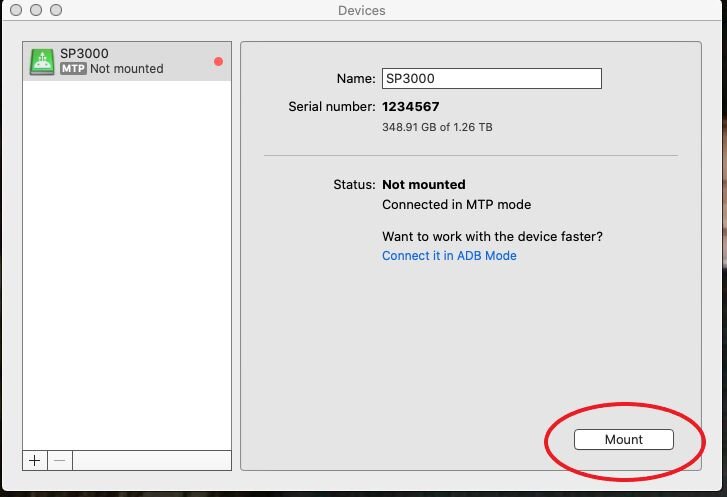
5. Once mounted, the status in the top left corner should change to "MTP Mounted"
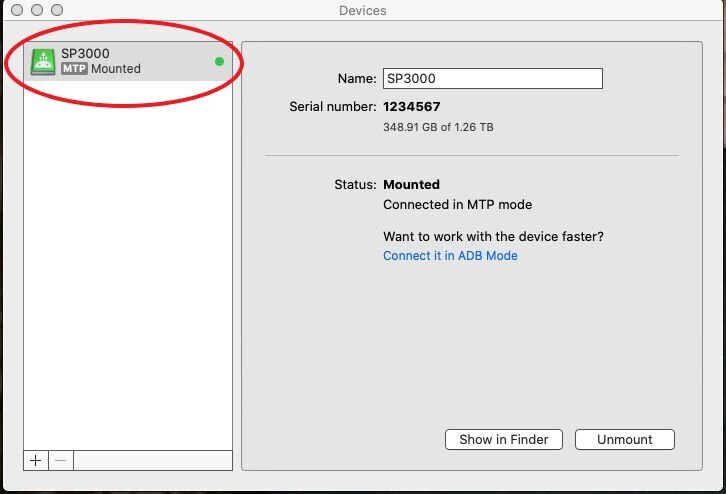
Step 6: Launch the Macintosh HD File Folder and Access DAP
Now that the DAP is mounted, click on your Macintosh HD icon to open this window.
Your DAP should appear in the list on the left.
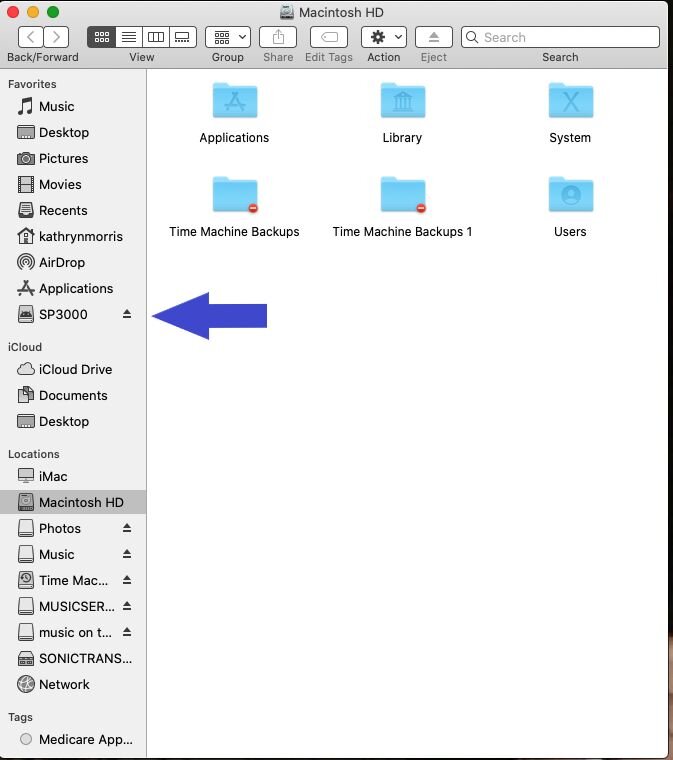
Click on the DAP name to open the device. A new window will appear with the internal storage folder and the folder in the Micro SD card (if you have one installed.)
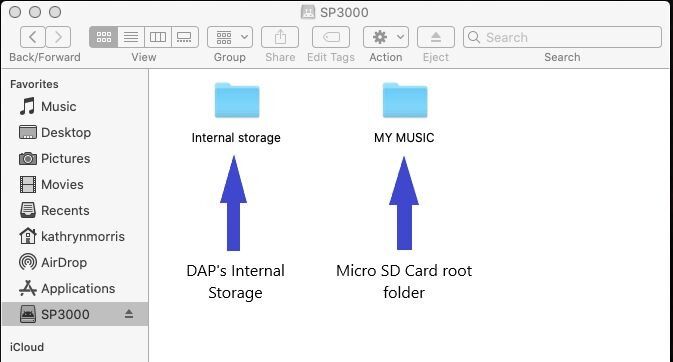
Step 7: Begin File Transfer Process
- Click and open the folder that you want the transferred files to be stored in
- For the Internal Storage Folder, make sure to click and open the sub-folder named "MUSIC." This is the only location where you can store your music files that will be recognized by the DAP's software. For the Micro SD card, you can store the files in any sub-folder you create, if any.
- After you have the receiving folder open, open the folder where you have your music stored on the computer or external hard drive
- With both the sending folder and receiving folder open, simply click, drag, and drop files from the sending to the receiving folder
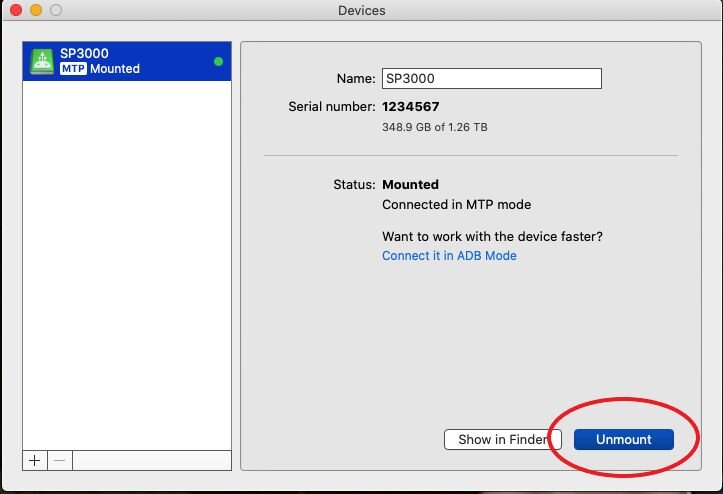
Step 8: Return to the MacDroid Program
After you've copied all files, go back to the MacDroid program on your computer and click on "Unmount" in the bottom right corner.
Now with the DAP unmounted, you can disconnect the DAP from the computer and close all windows. The DAP will begin scanning the new files and adding them to the library.
Transferring iTunes from Windows
Transferring files from a Windows computer requires the latest version of iTunes, the 3rd party conversion program TunesBank, an AK Player, and USB cable.
When converting music files to different formats
Step 1: Launch TunesBank and iTunes on your Computer
Note that iTunes will run in conjunction with TunesBank, and TunesBank will load all your music content from your iTunes library.
Step 2: Add your music to TunesBank
The "Library" tab at the top is where you'll find your music to select for conversion. You can select individual songs or select "Batch Conversion" to select as many songs as you want. You can also create playlists in iTunes to batch the desired music together for an easy selection in TunesBank.
Step 3: Choose your output formatting
Under the Output Settings below the music selection, you can adjust the format/codec, quality, bitrate, sample rate, the output folder, and the file name.
Step 4: Begin converting your music
Simply press the "Convert" button to start the process. You can also head back to the music library and add new files to the queue for conversion. Once TunesBank is finished, you can click the "Finished" tab and click "View Output File" to see the new converted music in the output location you selected.
Step 5: Connect your AK Player to the computer via a USB Cable
Now you can copy and paste or click and drag the new converted music from your TunesBank file location to the Astell&Kern directory. Once the files have completed transferring you can eject the music player from your computer.
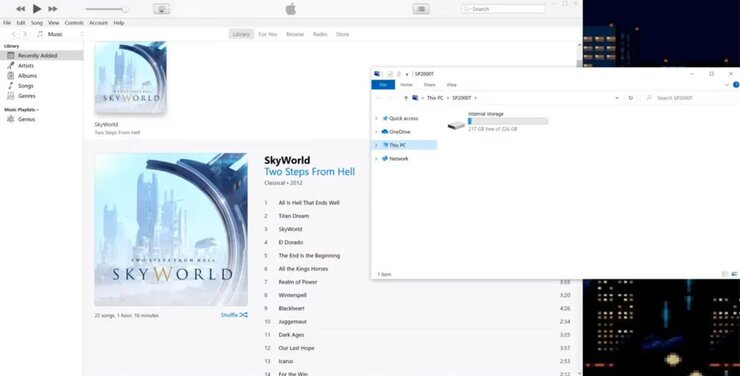
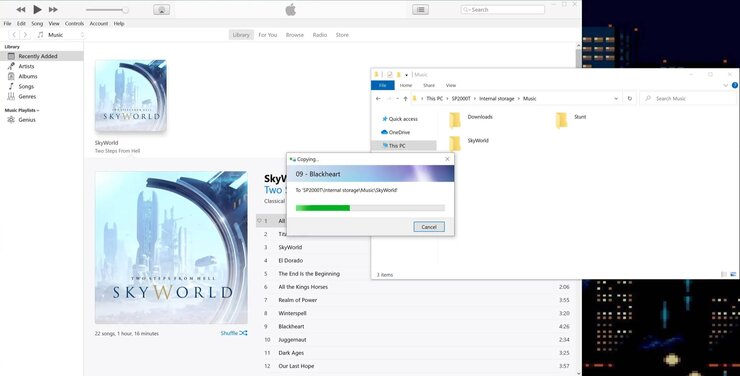
When transferring files directly to the DAP
Step 1: Connect your AK Player to your computer via a USB Cable
Your device directly should automatically pop up in a new window when recognized by your PC.
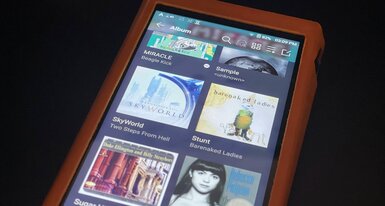
Step 2: Go to your iTunes music library
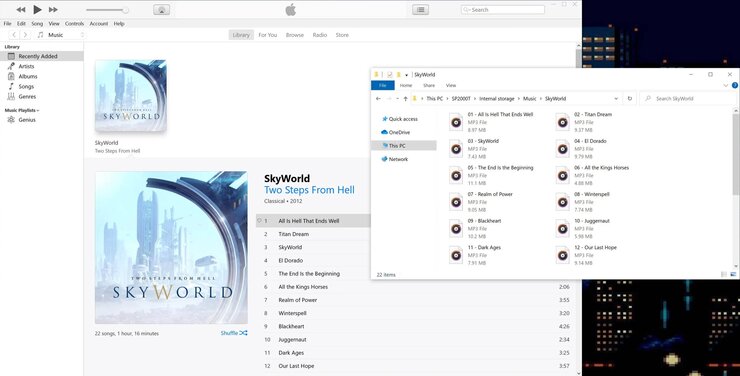
Here you can simply highlight the selected music you want to transfer and drag-and-drop the music to the DAP music folder. Eject the device when the file transfer has completed.
Setting Up Astell&Kern DAPs with Roon
Setting your DAP up with Roon has never been easier now that many A&K DAPs are Roon Ready. Being Roon Ready means that Astell&Kern players transparently discover and connect to Roon without any configuration, and bit-perfect audio is delivered from Roon to the player. Together, Roon and Astell&Kern deliver the power, flexibility, and performance of networked audio, with the easiest setup and highest reliability available.
Remember that Roon Ready is NOT available on ALL Astell&Kern DAP Music Players. Please check the list below to make sure if your AK music player is compatible. The good news is that all future DAPs from Astell&Kern will likely be released Roon Ready, so support for this feature will become much more widespread.
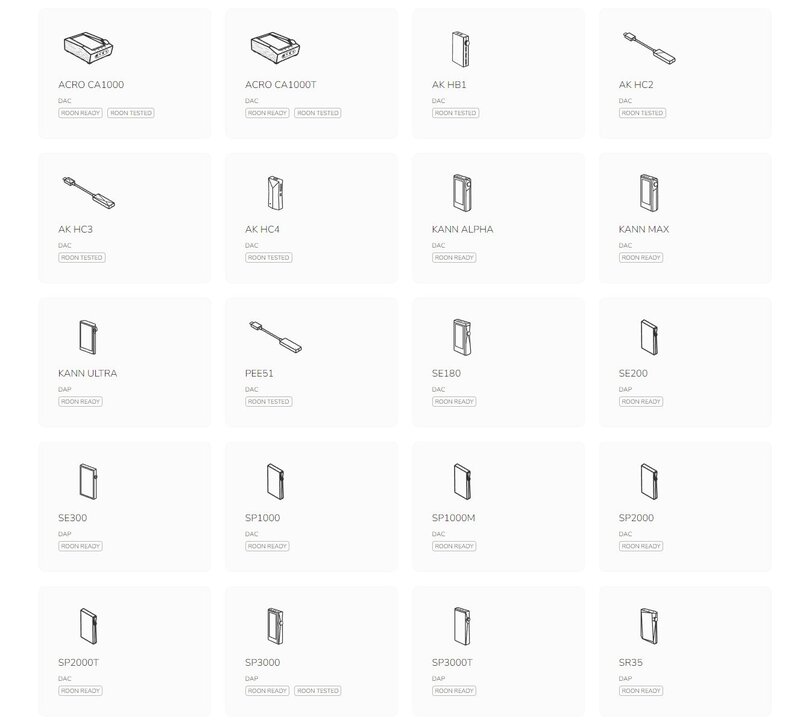
How to set up your device to work with Roon
Step 1: Make sure your Roon Core is set up and currently running over your network
Step 2: Once you have Roon up and running, connect your AK DAP to the same network as your Roon Core. Roon will not be able to communicate with your music player if they are not on the same network.
Step 3: On your DAP, navigate to the settings panel by pressing on the AK logo and then pressing on the "Settings" option found at the bottom of the list
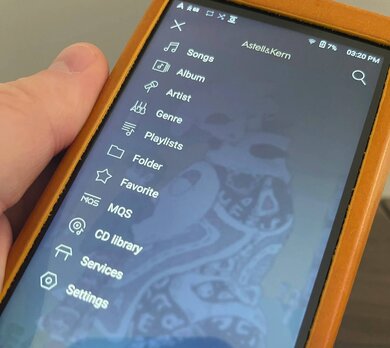
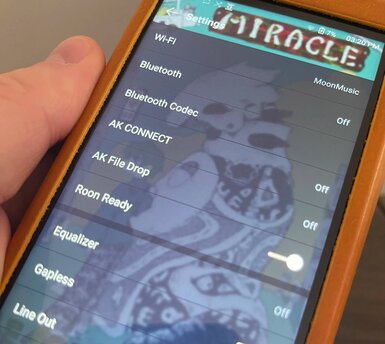
Step 4: Open the settings menu and find the option for "Roon Ready"
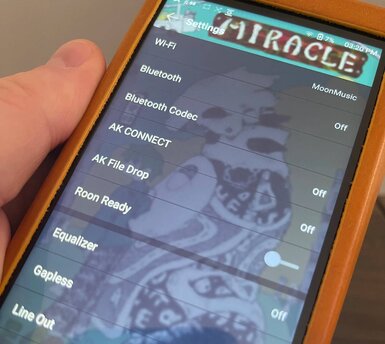
Step 5: If not selected already, tap on the setting to activate and you will see the slider appear as shown here indicating that "Roon Ready" is now available.
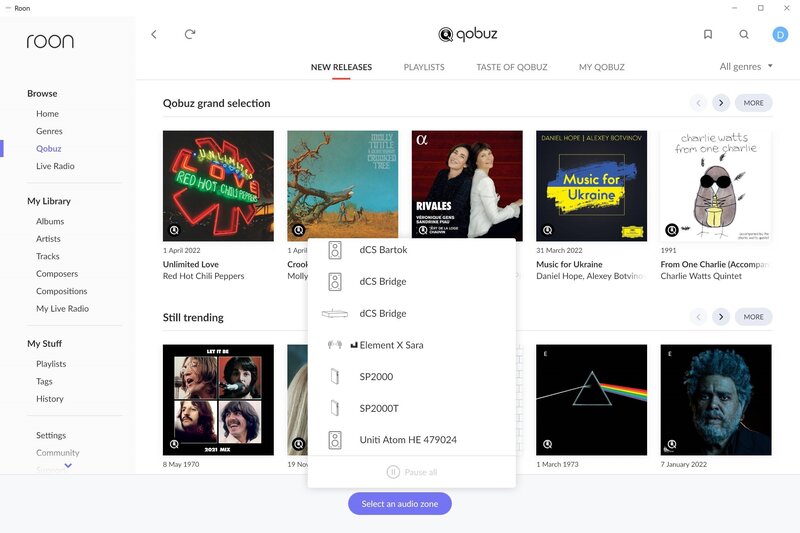
Step 6: Next, go back to your Roon Core, Computer, or Roon Remote device and navigate to the audio panel. In the screen above, you'll see it in a light purple in the bottom center labeled, "Audio Zone." There you will see all available devices.
Select your DAP as the Audio Zone. In this case, it is the SP2000T music player. You can also give it a nickname if you want to better identify the device.
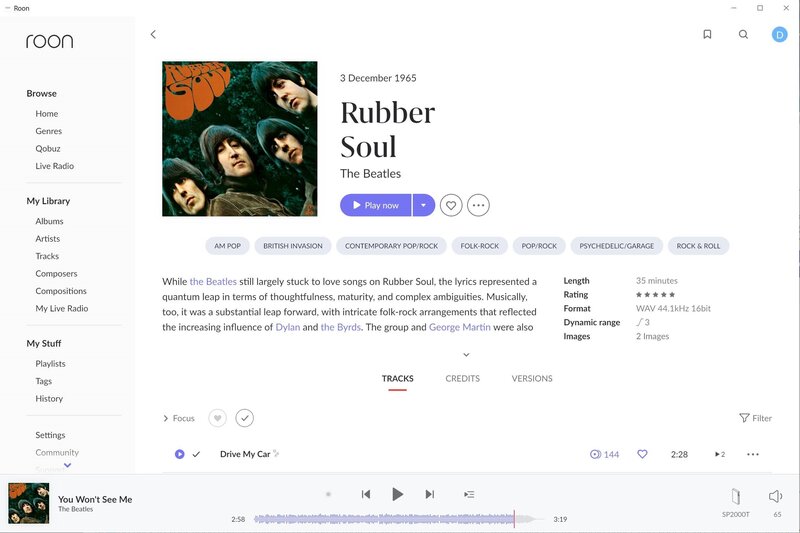
Step 7: You can confirm that your DAP is selected by checking the icon in the lower right of the window next to the volume settings. Here you can see "SP2000T." Then, go back to the main menu of Roon and choose a song for playback.
Step 8: Next, you can check on your music player and you should see the track playing back your selection in Roon.
Stream Music Wirelessly with AK Connect & BT Sink
Wireless Music Streaming with AK Connect
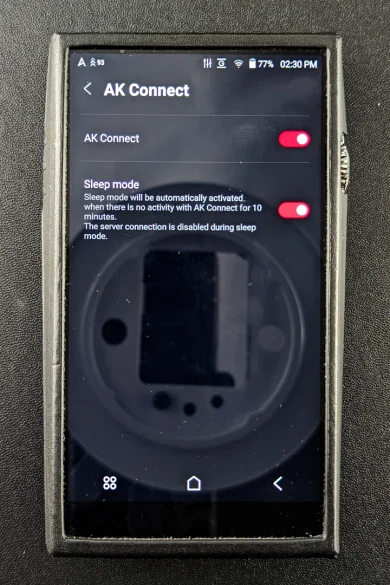
AK Connect is a feature available on AK DAPs that allows you to wirelessly stream music from your DAP to compatible devices such as smartphones, tablets, and network players. This feature essentially turns your Astell&Kern DAP into a source device for streaming music over a local network. Here's how to use AK Connect on an Astell&Kern DAP:
1. Ensure Wi-Fi Connectivity: First, make sure that your Astell&Kern DAP is connected to a Wi-Fi network. This is necessary for AK Connect to function.
2. Open AK Connect: On your Astell&Kern DAP, navigate to the menu and find the AK Connect option. This may be located under Settings or Network settings, depending on the model of your DAP.
3. Select AK Connect: Once you've found the AK Connect option, select it to open the AK Connect menu.
4. Start AK Connect Server: In the AK Connect menu, you'll see an option to start the AK Connect server. Select this option to activate the AK Connect server on your DAP.
5. Connect from External Device: Now, on your smartphone, tablet, or other compatible device, download the AK Connect app from the app store (available for both iOS and Android).
6. Open AK Connect App: Open the AK Connect app on your external device. The app should automatically detect the AK Connect server running on your Astell&Kern DAP.
7. Select Your DAP: In the AK Connect app, you should see your Astell&Kern DAP listed as an available device. Select it to establish a connection.
8. Browse and Play Music: Once connected, you can now browse your music library on an external device using the AK Connect app. You can select songs, albums, playlists, and more to play directly through your Astell&Kern DAP. The audio will be streamed wirelessly from your DAP to the external device.
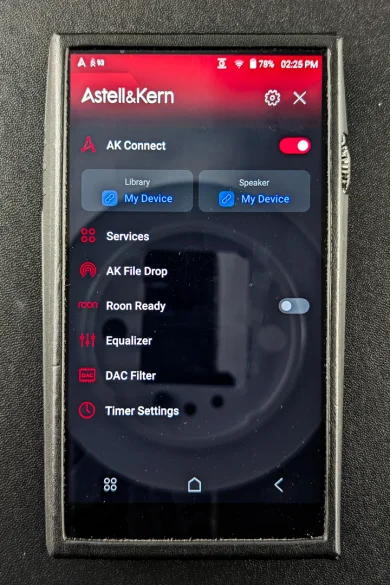
The AK Connect app also allows you to control playback, adjust volume, skip tracks, and more, all from the convenience of your smartphone or tablet. With AK Connect, you can now enjoy your high-quality music library stored on your Astell&Kern DAP on a variety of devices throughout your home, creating a seamless and versatile music streaming experience.
How to Set Up BT Sink
Another option for streaming music files wirelessly is BT Sink. BT Sink allows you to play music and control your player from another device, like a smartphone or tablet. For instance, if you have music stored locally on your phone or laptop and you want to access said library that might not be on your music player, you can connect it to the AK player for immediate file playback through the DAP itself via Bluetooth sync.
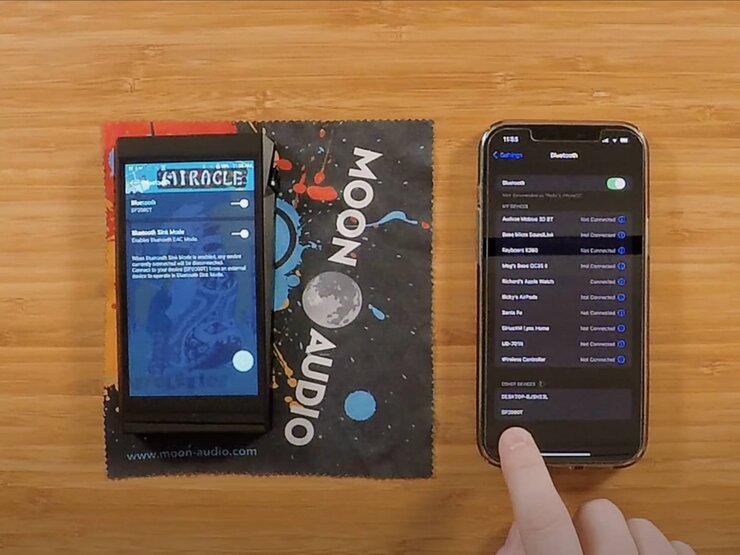
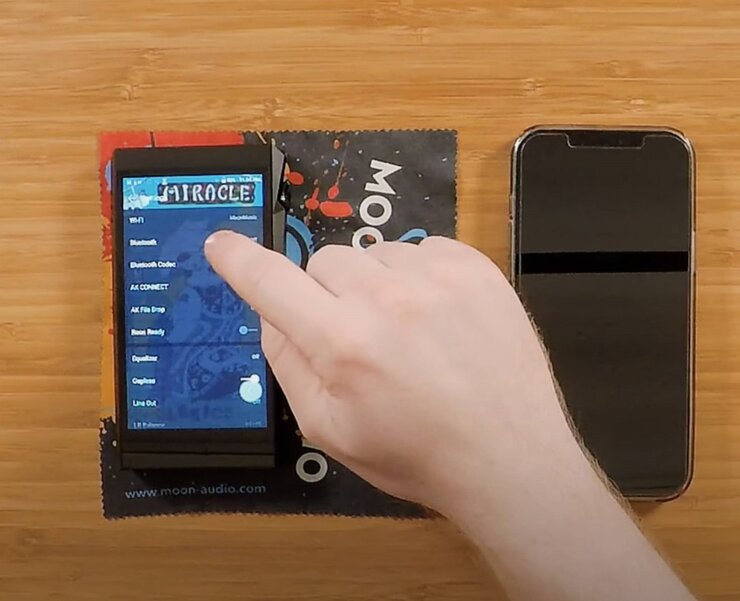
1. Turn on Bluetooth: First things first: you'll want to make sure to turn on Bluetooth on your DAP.
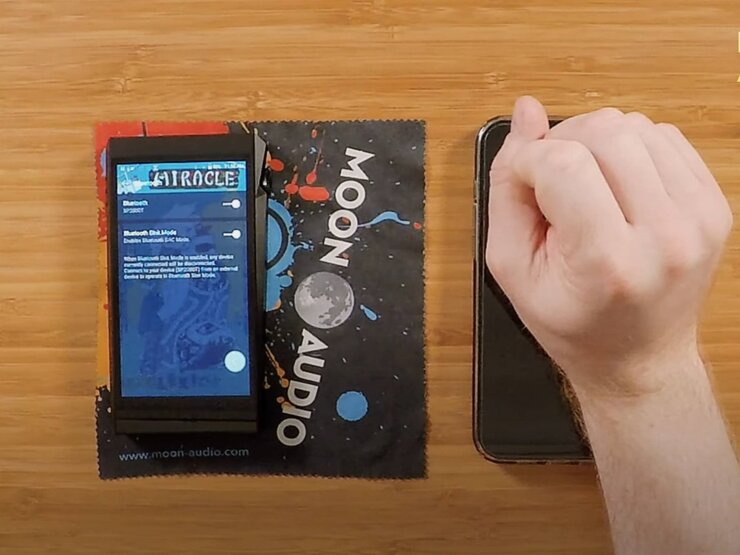
Head to Settings (via the "A" menu button) and click on "Bluetooth." Turn Bluetooth on. You'll see Bluetooth Sync Mode appear underneath.
2. Enable BT Sink Mode: After turning on Bluetooth, you'll see the "Bluetooth Sync Mode" pop-up underneath. Select this to enable Bluetooth DAC mode (Note that once you select this, Bluetooth will cycle off, but will pop back up showing that you've enabled BT SINK.)
*When Bluetooth Sync Mode is enabled any device that is currently connected will be disconnected.
3. Enable BT on External Device: Now that your DAP is ready for BT SINK, we'll want to get your connecting device ready to pair.
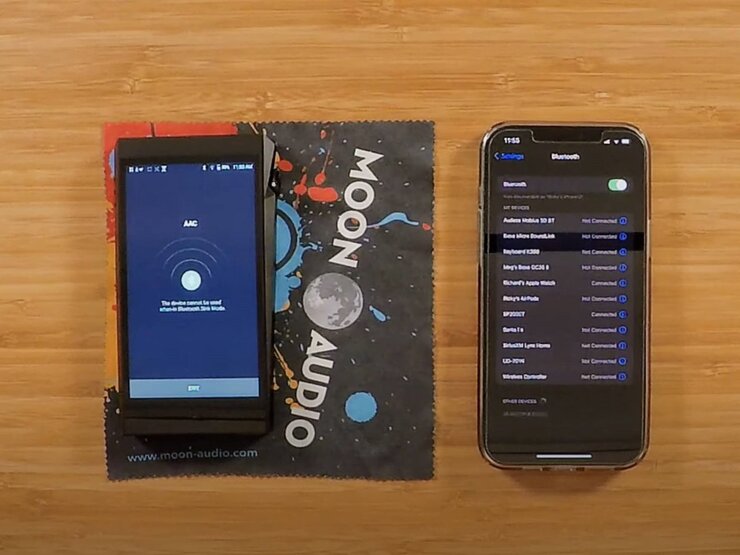
Head to the settings in your phone or computer and access your Bluetooth settings. Make sure that Bluetooth is on or enabled. Go through the connection process of pairing a new device.
4. Pair Device: Once you see your device pop up, select it and you'll see a pairing request come up on your music player.
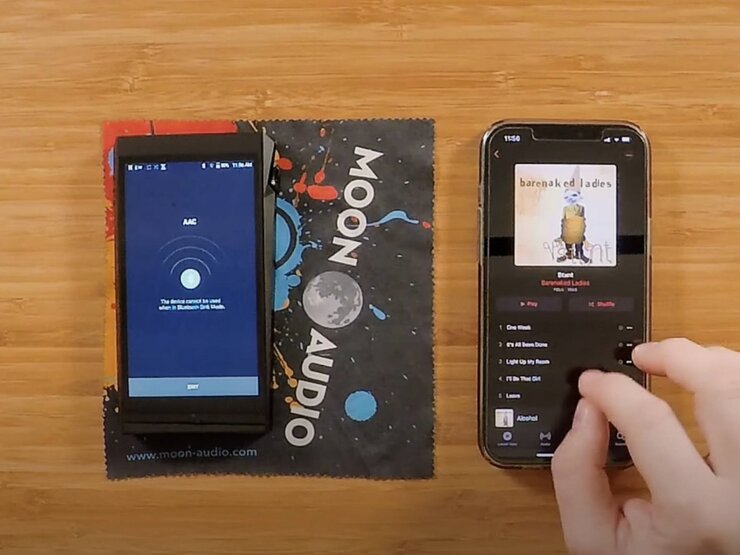
In some cases, like our video with the iPhone, the devices might display a 6-digit number - make sure these numbers match before pairing to ensure that you are connecting the desired device.
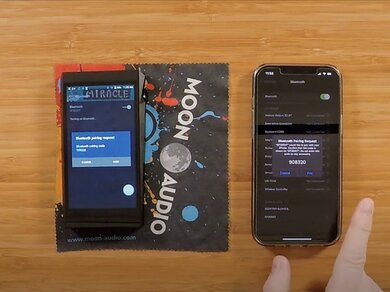
5. Confirm Pairing: Your two devices should be paired now.
If so you should see on your DAP a new screen appear with the transmitting Bluetooth codec at the top middle (in our video it shows "AAC").
Note that your DAP cannot be used while in Bluetooth DAC/sync mode. All controls will be done via the connected external device. You should also see that the DAP is paired to your external device via the Bluetooth menu.
6. Play Music: Once connected you are all set! Simply queue up some music on your external device on the local library there and enjoy your music through the Astell&Kern DAC and headphones.
Making the Most of Your Astell&Kern DAP in the Car
Can I use my Astell&Kern DAP in the car?
Short and sweet–You can use your AK DAP in the car but it isn't compatible with Android Auto and Apple CarPlay, meaning you won't get to use all the neat features associated with those platforms.
Officially, Astell&Kern Digital Audio Players are not compatible or optimized for Android Auto and Apple CarPlay. Astell&Kern's Car Mode amounts to a horizontal or vertical layout for the music player, creating larger and more manageable controls. Enlarging the play/pause, back and forward buttons, the layout transforms into a driver-friendly design much like Android Auto and Apple CarPlay does for your connected devices.
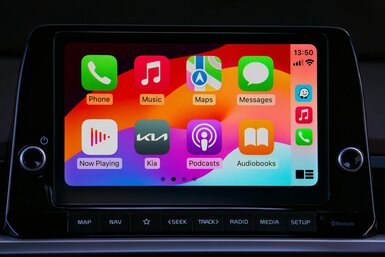
The main question is how will your music player work connected to your vehicle?
Since Apple CarPlay and Android Auto are designed to integrate various functions of say, your phone, this won't be the case with your Astell&Kern music player. Given the sole purpose of the device is to play music, this will be the only functionality that will transfer to the vehicle infotainment system (if at all). So don't expect to be able to make calls, use GPS and map features, along with various other application support.
You have two connections options (at the moment): Bluetooth and wired connection via USB or Auxiliary. If your vehicle has an auxiliary port, then the easiest way for you to get the best quality audio from your device is to connect via a cable. A cable is always going to give you better quality sound over a wireless option. With wireless audio you can experience dropouts and most Bluetooth codecs do not support high-resolution audio. Wired audio is the most reliable way to get the most fidelity out of your music, no matter the ergonomic scenario you find yourself in.
However, if you insist on using Bluetooth, it's easy! You shouldn't have any problem transmitting your audio from your Bluetooth-capable Astell&Kern device (as long as your vehicle supports Bluetooth connectivity.) Regarding transmitting audio through a Bluetooth connection, your Astell&Kern DAP will work in the same way any other Bluetooth device transmits audio. Of course, overall audio quality will depend on various codecs and compatibility. Generally speaking, if your vehicle has Apple CarPlay or Android Auto, it's as simple as connecting your device to the audio system and selecting the Bluetooth Audio in the menu options. Your audio should then transmit through your vehicle's speakers. This is the most reliable and only "official" way that your Astell&Kern DAP music player will work with your vehicle audio system.
How many devices can you connect to your vehicle?
The other thing to consider is that Android Auto and Apple CarPlay can only connect to one host at a time, essentially becoming an extension or accessory of your phone. That means if you are wanting to connect your phone and DAP simultaneously, you'll have to choose one or the other for CarPlay or Android Auto functionality. Your best setup scenario would be to connect your phone directly to your vehicle's infotainment system and your DAP via Bluetooth audio playback.
The Wired Option
When it comes to cables, it's important to note that not all are created equal. Usually, the stock cables that come packaged with your gear will get the job done. I find that very few manufacturers put care and consideration into their cables like they do their headphones or other audiophile-grade equipment. Apart from the overall quality of the cables, materials matter as well, and they can adjust the sound signature of your device and music to your preference.
Our Dragon Portable Headphone Cables make the perfect auxiliary connection for your Astell&Kern DAP to your vehicle. The braided cable is durable yet flexible enough to configure in your vehicle to lay out exactly where you need it to go. Each Dragon cable has its own sound signature that will pair perfectly with your favorite genre of music. You can find out more at the links below. If your vehicle has a USB audio in/out, then our Silver Dragon USB cable would be a great choice as well. Make sure your vehicle manufacturer supports USB Audio before ordering. If you have the option, a cabled connection from your Astell&Kern DAP to your vehicle audio system is the way to go.
Astell&Kern Connections
Most Astell&Kern DAPs today use a USB-C connection for things like charging, file transfer, etc. One of the most common questions we get at Moon Audio is "Can I use my DAP as an external DAC in a desktop audio setup?"
Short answer–Yes! Your Astell&Kern DAP can easily function as an external DAC for your every need. Say you don't love the integrated DAC in one of your desktop units, or your missing link to completing your system is a DAC. Simply connect your AK DAP via a USB cable (with correct connections) and you're ready to enjoy some high-fidelity audio.
We recommend pairing Astell&Kern DAPs with our Dragon Audio Cables. Audio cables are the icing on your audio cake, and they can make or break your listening experience. At Moon Audio, we craft custom cables to improve the sound of your headphones and other audio gear. Your choice of cable is going to depend on a couple of factors, the first being the sound signature of your DAP.
The Silver Dragon USB Audio Cable is our top-of-the-line (USB or digital) cable created with ultrapure silver conductors for the best signal transfer for your digital music. The cable uses 99.99998% UP-OCC Stranded Silver 24AWG Teflon insulated stranded conductors with a double-layer shield to ward off outside interference. The Silver Dragon USB is the most resolute USB cable on the market today for an amazing price point. So stop paying for over-inflated cables and give it a try. Be prepared to be amazed at the difference it will make when transferring your computer audio catalog to your USB applications.
We also make a Black Dragon USB Cable variant. The Black Dragon USB Audio Cable uses 99.999% pure copper 24AWG Teflon insulated stranded copper conductors with a double-layer shield to ward off outside interference. Standard USB cables are not up to the task of large bit rate information. Drew Baird, P.E., Moon Audio Owner and Founder, has optimized this cable for audio transmission of large hi-res files. USB cables can make big a difference, and the Black Dragon is one heck of a bang for the buck cable.
FAQ & Resources
Do Astell&Kern Players support XAPK Files?
⌃
What music streaming services are supported?
⌃
How do I download music for offline listening?
⌃
How do I update my Astell&Kern Music Player?
⌃
How do I enable Offline Mode on Tidal?
⌃
Astell&Kern AK File Drop Tutorial & Review
Astell&Kern BT Sink Tutorial & Review
Related Videos
These Flagship Music Players are the Best Money Can Buy
Digital Audio Cables & Analog Interconnects Explained
5 Reasons to Buy an All-In-One DAP In 2024
3. When the application opens, you will see a screen similar to this one. As you can see, at the top left it shows the SP3000 "MTP Not Mounted." If a similar message is displayed on your screen, click "Connect via MTP" to mount the DAP.


